

Tips: NetSuite Custom Fields
A huge advantage of NetSuite is the ability to perform tasks quickly without extensive technical knowledge. Most ERP systems require difficult coding and take hours to customize. The ability to add custom fields, forms and reorganize which way the forms are displayed allows businesses to change and adapt to their personalized environment.
This tips guide explains what custom fields are, what types are available, and how to set them up, assign them and edit them for your specific needs.
Get NetSuite Services Today
NetSuite offers 8 different types of custom record and transaction fields that you can create in different sections of the NetSuite interface:
1. Item Fields – Used to add fields to item records. These records include Accounting and website item records — such as inventory, non-inventory, service, group, kit/package and assembly/bill of materials item records.
2. Entity Fields – Used to add fields to entity records. These records include Relationship and Employee records — such as customers, vendors, employees, contacts, partners or groups.
3. CRM Fields – Used to add fields to CRM records. These records include Activity, Marketing and Support records — such as tasks, events, campaigns or cases.
4. Transaction Body Fields – Used to add fields to the body of transaction records. These records include purchase, sale, journal entry and expense report records — such as sales orders, invoices, purchase orders, opportunities, Web store transactions or item receipts.
5. Transaction Line Fields – Used to add fields to the columns of transaction records. These fields display in the line-item columns of transaction records and include fields such as expense items, purchase items, sales items, store items or opportunity items.
6. Item Number Fields – Used to add fields to serial and lot numbered inventory records to track information specific to each item or workflow unique to your business. For example, quality control procedures or recall information could be tracked.
7. Other Record Fields – Used to add fields to custom records not defined by the above categories, including campaign events, classes, competitors, departments, and locations.
8. Other Sub list Fields – Used to add fields to the columns of a custom sub list. These fields display in the line-item columns of sub lists.
You can distinguish custom fields and standard fields on pages in NetSuite if you enable the Show Internal IDs preference. Home > Set Preferences under the Defaults section of the General subtab. With the preference enabled, when you click on a field, the field level help popup shows a field ID in the lower right corner. If the field you clicked on is a custom field, the ID from the custom field record is shown.
How To Create a Custom Field:
1. Fields are straightforward to create once you know how to navigate around the NetSuite system. Fields can be accessed under Customization > Lists, Records, & Fields. The Custom Field page is displayed for the selected type.
Once you are in the Entity field you’ll see all of the existing custom fields that have already been created. These fields are labeled differently starting with the ID. You can create a new custom field by clicking “new” on the bottom right of the screen, giving you options like this with many different boxes to select.
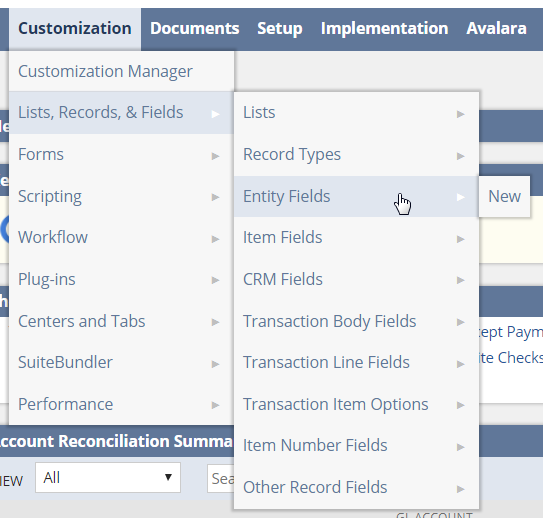
Applies To: This tab lets you check which NetSuite object this field is associated with.
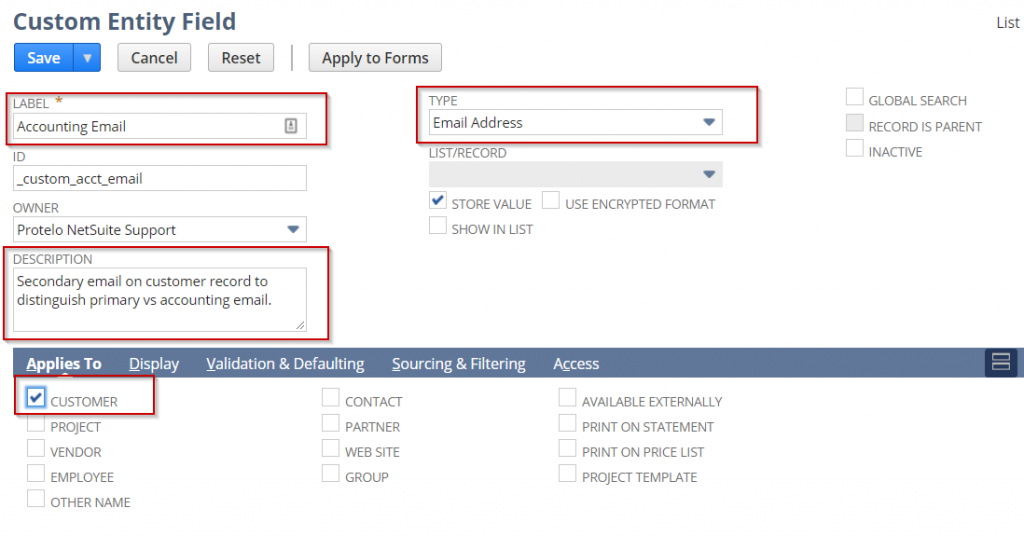
2. In the Label field, enter up to a 200-character name or description for the field that is meaningful to your NetSuite users. When creating a label, make sure you preview how it will appear on pages and printed forms. The label is displayed by the field on the transactions you select. If you change the name of a custom field later, the name is not automatically updated on custom forms that contain the field.
3. NetSuite automatically modifies the ID entered into the field with a prefix that corresponds to the type of field being created as listed below. The field can be set to an alphanumeric string up to 30 characters long.
Note* Best practice is to rename the custom field ID’s for identification in future customizations.
CRM: custevent
Entities: custentity
Items: custitem
Record: custrecord
Sublist: custrecord
Transaction Body: custbody
Transaction Column: custcol
Remember: Entering your own IDs enables you to maintain them in SuiteScript. If you do not enter an ID now, NetSuite automatically assigns one when you save the new custom field. After a field ID has been assigned, it can be changed by clicking the Change ID button at the top of the page.
4. Select the owner of the custom field. Only the owner can modify the record. Your name is selected by default.
5. Enter a description of the field.
6. In the Type field, select the kind of custom field you want to create.
7. If you have chosen List/Record or Multiple Select in the Type field, select the list or record in the List/Record field that contains the items for the list field.
8. By default, the Store Value option is enabled so that custom field values are stored in your NetSuite account. Clear the box to indicate that any changes entered not be stored in the custom field. Not storing the value enables you to look at data that is stored elsewhere. If you do not store the value, changes will be discarded, so you may want to make the field read-only.
9. Some custom field data types provide a Use Encrypted Format option you can enable to encrypt the field values stored in the database.
10. Check the Show In List box to have the field automatically show in the list of records the field is applied to.
11.You can index the field for global searches if Store Value is checked, and if you have chosen any of the following in the Type field: Currency, Decimal Number, Email Address, Free-Form Text, Help, Hyperlink, Inline HTML, Integer Number, Percent, Phone Number, Text Area.
After you check the Global Search box for a custom field, each global search compares keywords to that custom field’s values, in addition to comparing with record name and ID field values. For more information, check out our Global Search Tips.
12. If you are creating a List or Record custom field, check the Record is Parent box to indicate that the record type selected is a parent record. The field is used to create a parent-child relationship between two record types.
13. If you later want to inactivate the field, check the Inactive box. For more information, see Inactivating a Custom Field.
14. After you have created a custom field, you should define which record types the field can be used in.
How to Edit A Custom Field
Go to Customization > Lists, Records, & Fields, where [Custom Fields] is the type of custom field you want to modify. This page lists all of the custom fields you can modify for that field type:
- Field ID
- Label
- Description
- Field Owner
- Type
- Store Values for this field
- Use encrypted format
- Automatically show field in the list of records
Custom fields are just one of the many ways to edit your NetSuite solution to adapt to your company. If you would like to find out more about how NetSuite works, have questions, or want to learn more, please don’t hesitate to get in touch with our team of experts!
Written by, Brianne Yeomans, Senior Business Consultant

More Tips, Tricks and NetSuite How-To’s
- NetSuite Guidelines and Tips for Importing CSV Files
- NetSuite Custom Segments
- NetSuite Search Formulas & Methods Overview
- How To Automatically Email Searches and Reports
- Import Online Bank Data and Auto Match Transactions in NetSuite
- FAQ: NetSuite Dashboards – Publishing, Permissions & Updates
- Customizations in NetSuite: What to Know
- NetSuite Data Imports
- How to Create, Edit and Manage Custom KPIs
Have NetSuite questions? Need expert NetSuite assistance?
Contact our team today! We are not your typical NetSuite Solution Provider. Our services come with no minimum hours per month, no up-front costs, on-demand access to experts and a fully U.S.-based team with extensive NetSuite experience.
We are leading NetSuite experts that can:
• Build Custom Workflows and SuiteScript
• Set-up Advanced Searches and Reporting
• Customize NetSuite & Automate Processes
• Provide Implementation Support
• Augment your NetSuite Team
• Build Custom Reporting
• And More

Follow us on Social for NetSuite tips, tricks, and ERP fun:
YouTube, LinkedIn, Twitter, Pinterest, Instagram, and Facebook
